The Complete Guide to IoT Prototyping and Device Testing: A Step-by-Step Approach
Estimated reading time: 15 minutes
Key Takeaways
- Effective IoT prototyping significantly reduces development costs and increases success probability
- Market validation before full development prevents creating products nobody wants
- Comprehensive testing across functionality, connectivity, power, security, and environmental factors is essential
- Hardware-software integration requires concurrent design for optimal performance
- Iterative improvement through testing leads to market-ready products
Table of contents
- Understanding IoT Fundamentals
- Getting Started with IoT Prototyping
- Types of IoT Prototypes
- Market Validation for IoT Products
- Essential Tools for IoT Prototyping
- Step-by-Step IoT Prototype Development
- Hardware-Software Integration in IoT
- IoT Device Testing Fundamentals
- Practical IoT Device Testing Methods
- Integration Testing for IoT Systems
- Iterative Improvement Through Testing
- Best Practices for IoT Prototyping and Testing
- Conclusion
- FAQ
The Internet of Things (IoT) has transformed how devices connect and share data across industries. From smart homes to industrial manufacturing, IoT systems enable unprecedented levels of automation and insight. But creating successful IoT products requires careful planning and testing. This guide walks through the essential steps of IoT prototyping and device testing to help you bridge the gap between concept and market-ready product.
Understanding IoT Fundamentals
IoT systems consist of four main components working together:
- Sensors and devices that collect data from the environment
- Connectivity mechanisms that transmit data
- Data processing systems that analyze information
- User interfaces that allow human interaction
These components come together in various applications:
| Industry | Common IoT Applications |
|---|---|
| Consumer | Smart homes, wearables, voice assistants |
| Industrial | Manufacturing automation, predictive maintenance |
| Healthcare | Remote patient monitoring, medical devices |
| Agriculture | Precision farming, livestock tracking |
| Urban | Traffic management, environmental monitoring |
Each IoT system typically includes sensors, microcontrollers, communication modules, power management systems, and cloud connections. Understanding these building blocks is essential before beginning your prototyping journey.
Getting Started with IoT Prototyping
IoT prototyping transforms abstract ideas into testable models before investing in full production. This critical phase serves multiple purposes:
- Testing technical feasibility
- Validating user experience designs
- Identifying problems early
- Reducing development costs
- Increasing success probability
Successful IoT prototyping requires several key skills:
- Basic electronics knowledge
- Programming (typically Python, C/C++, or JavaScript)
- Networking concepts
- Data management principles
Early prototyping prevents costly changes later in development. By identifying design flaws before production, you can save significant time and resources.
Types of IoT Prototypes
Different prototype types serve various stages of development:
Proof of Concept (POC) prototypes demonstrate core functionality and technical feasibility. These simple implementations verify that your central idea works.
Rapid prototypes use sketches, wireframes, or simple models to quickly test concepts with minimal investment. They help gather early feedback on design direction.
Minimum Viable Products (MVPs) solve the primary user problems with enough functionality for real-world testing. MVPs help validate market interest before full development.
Choose your prototype approach based on:
- Project goals
- Budget constraints
- Timeline requirements
- Technical complexity
Market Validation for IoT Products
Before committing major resources, validate market demand for your IoT solution:
- Research existing competitors and similar products
- Test demand with target users using early prototypes
- Gather feedback through interviews and surveys
- Consider that no competition might signal either opportunity or lack of market need
Effective validation methods include:
- Structured user testing sessions
- Beta testing programs
- Crowdfunding campaigns as market tests
- Industry expert consultations
This validation step prevents developing products nobody wants, saving significant resources.
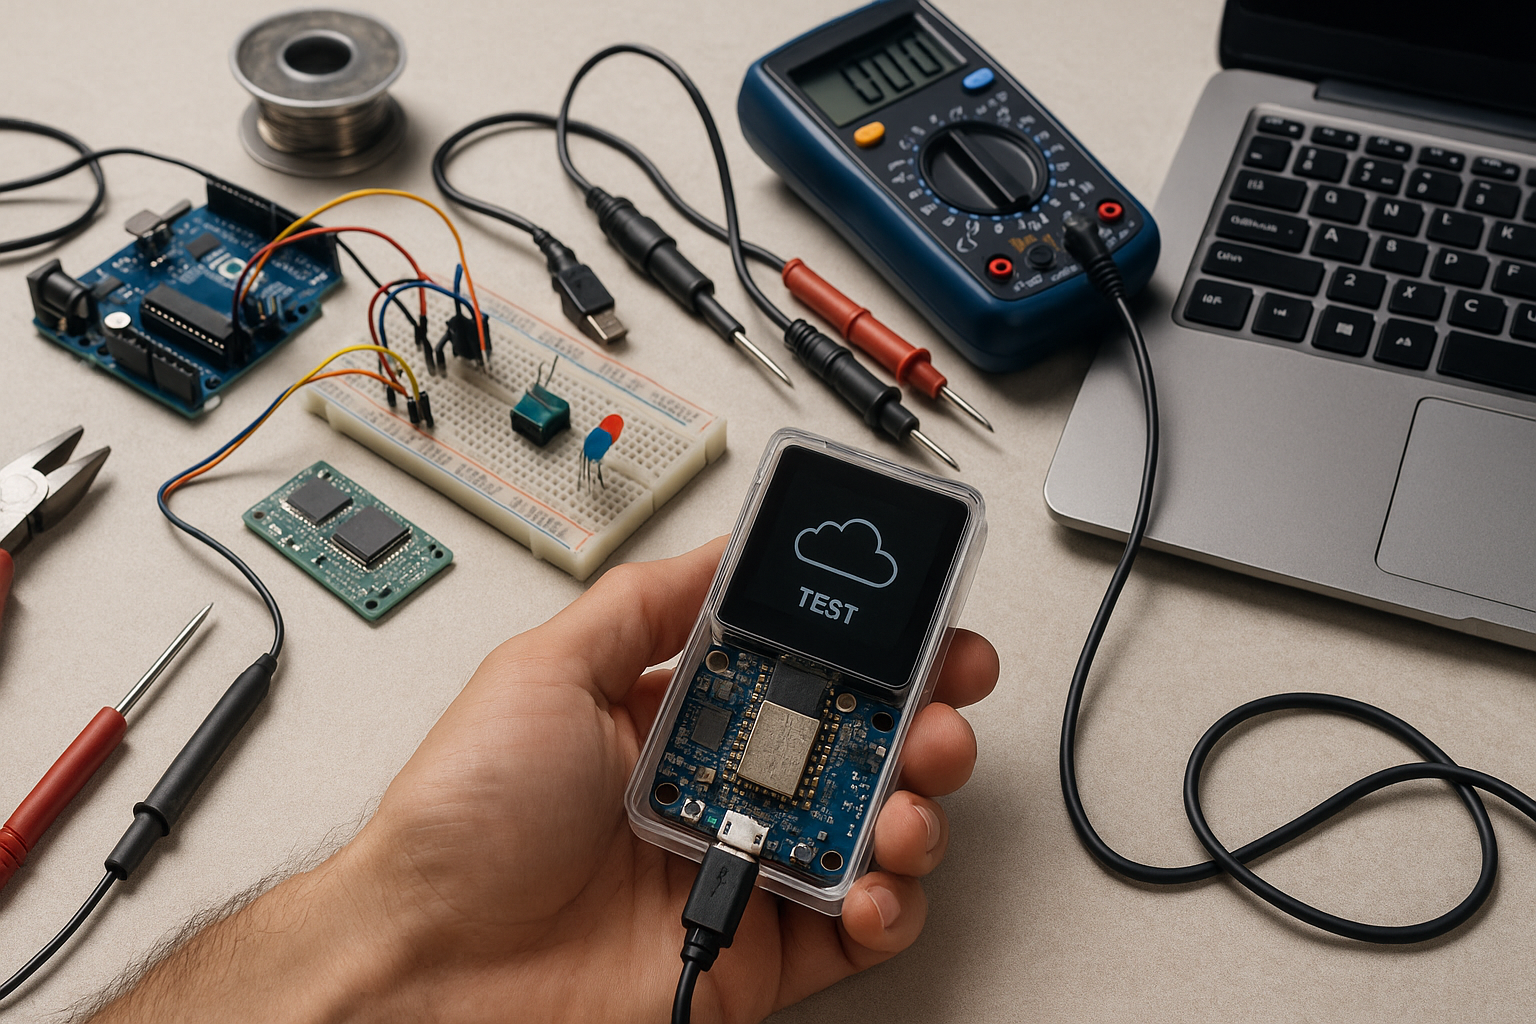
Essential Tools for IoT Prototyping
Hardware Components
- Development boards: Arduino, Raspberry Pi, ESP32
- Sensors: Temperature, humidity, motion, light
- Actuators: Motors, relays, solenoids
- Display options: LCD, OLED, touch screens
- Power supplies: Battery options, solar, AC adapters
Software Platforms
- Arduino IDE
- Raspberry Pi OS
- PlatformIO
- Visual Studio Code with IoT extensions
Communication Modules
- Wi-Fi
- Bluetooth/BLE
- Zigbee/Z-Wave
- LoRaWAN
- Cellular (NB-IoT, LTE-M)
Testing Equipment
- Multimeters
- Logic analyzers
- Protocol analyzers
- Power consumption meters
Cloud Platforms
- AWS IoT
- Google Cloud IoT
- Microsoft Azure IoT
- ThingSpeak
- Blynk
Step-by-Step IoT Prototype Development
1. Planning and Requirements
Start by defining clear objectives for your prototype. Create detailed specifications that outline functionality, performance requirements, and constraints. Establish success criteria that will determine when your prototype is ready for the next stage.
2. Select Hardware Platform
Choose platforms based on:
- Processing requirements
- Input/output needs
- Connectivity options
- Power constraints
- Budget limitations
3. Design System Architecture
Create system diagrams showing how components interact. Define data flows between sensors, processors, and cloud services. Consider scalability from prototype to production. Learn about system architecture design
4. Component Selection
Select components based on:
- Performance specifications
- Power consumption
- Size constraints
- Availability
- Cost
5. Circuit Design and Integration
Create schematics for your circuit. Begin with breadboard prototypes to test basic functionality. Move to custom PCBs for more advanced prototypes.
6. Programming
Develop firmware that handles:
- Sensor data collection
- Communication protocols
- Power management
- User interface elements
Hardware-Software Integration in IoT
The relationship between hardware and software defines IoT device capabilities. Design both elements concurrently to ensure compatibility and optimal performance.
Hardware development typically progresses through:
- Breadboarding for concept testing
- Prototype PCBs for refined testing
- Enclosure design for physical form
- Production-ready hardware
Software development must address:
- Memory constraints of embedded systems
- Power optimization strategies
- Real-time processing requirements
- Update mechanisms for deployed devices
Testing hardware-software interactions requires:
- Interface testing between components
- Performance optimization under various conditions
- Specialized debugging techniques
- Monitoring tools for system behavior
IoT Device Testing Fundamentals
Comprehensive testing ensures reliability, performance, and security. IoT devices require multiple testing types:
- Unit testing for individual components
- Integration testing for combined systems
- System testing for complete functionality
- Performance testing under various conditions
- Security testing for vulnerability detection
- User acceptance testing with target audiences
Setting up a proper testing environment requires:
- Hardware test fixtures
- Software simulation tools
- Network simulation capabilities
- Environmental controls (for temperature/humidity testing)
- Data collection systems
Practical IoT Device Testing Methods
Functional Testing
Test sensor accuracy, actuator performance, data processing, and user interfaces. Create test cases that verify each feature works as specified.
Connectivity Testing
Verify network connection reliability, protocol compatibility, and behavior during connection failures. Measure bandwidth, throughput, and latency under different conditions.
Power Testing
Measure power consumption in various operating modes. Estimate battery life and verify power management features work correctly. Conduct long-term power testing for devices expected to operate for extended periods.
Security Testing
Verify authentication, authorization, and encryption implementations. Test for common vulnerabilities and conduct penetration testing. Ensure data privacy protections function correctly.
Environmental Testing
Subject devices to temperature variations, humidity changes, vibration, and physical shock to ensure durability. Conduct electromagnetic interference testing for devices used in industrial settings.
Integration Testing for IoT Systems
Test integration with:
- Home automation platforms (Home Assistant, SmartThings)
- Voice assistants (Alexa, Google Assistant)
- Automation services (IFTTT)
- Multiple device interaction scenarios
Verify API implementations:
- RESTful API functionality
- MQTT communication
- Webhook implementations
- Third-party API integrations
Iterative Improvement Through Testing
Use test results to refine prototypes:
- Identify improvement areas
- Prioritize changes based on impact
- Create action plans
- Implement modifications
- Verify improvements through additional testing
Know when your prototype is ready for production:
- All critical requirements met
- Performance metrics achieved
- User testing shows positive results
- Major issues resolved
- Production scaling planned
Best Practices for IoT Prototyping and Testing
- Document everything: Requirements, designs, test plans, and results
- Use version control: For both hardware designs and software
- Implement quality assurance: Define standards before beginning
- Consider security early: Build in security from the first prototype
- Test with real users: Get feedback from your target audience
- Maintain regulatory awareness: Know what certifications you’ll need
- Plan for manufacturing: Consider production constraints during prototyping Learn about planning for production
Conclusion
Successful IoT development depends on thorough prototyping and testing. By following structured processes, you can identify and resolve issues early, validate market demand, and create products that truly meet user needs.
Start with clear requirements, choose appropriate tools, test early and often, document everything, and embrace iteration. This approach minimizes risk and maximizes the likelihood of creating successful IoT products that stand out in an increasingly connected world.
FAQ
What is the most important step in IoT prototyping?
The most important step is thorough requirement definition and planning. Well-defined requirements prevent scope creep and ensure your prototype addresses the actual problem you’re trying to solve.
How much should I budget for an IoT prototype?
Budget varies significantly based on complexity, but expect to spend $5,000-$30,000 for professional-grade IoT prototypes. Simple proof-of-concept prototypes using development boards might cost $500-$3,000.
How long does IoT prototyping typically take?
Simple prototypes might take 1-2 months, while complex systems with custom hardware could require 6-12 months from concept to tested prototype. Timeline depends on complexity, experience, and available resources.
Should I use off-the-shelf components or custom hardware?
Begin with off-the-shelf components and development boards for early prototyping. As your design matures and specific requirements become clear, transition to custom components where necessary for size, power, or performance optimization.
What are the most common IoT security issues to test for?
Test for insecure authentication, unencrypted data transmission, lack of secure boot mechanisms, hardcoded credentials, insufficient update mechanisms, and physical security vulnerabilities.